
Introduction to Pumpkin Oreo Balls
Fall is just around the corner, and what better way to celebrate the season than with these delightful Pumpkin Oreo Balls? If you’re searching for a simple, no-bake treat that captures the essence of autumn, you’ve arrived at the right recipe! These delicious little bites combine the rich taste of Oreo cookies with a creamy pumpkin filling, all perfectly coated in vibrant orange chocolate.
Why Pumpkin Oreo Balls are the perfect no-bake treat?
Let’s face it, life can get busy, and sometimes you just want a quick dessert without the fuss of baking. That’s where Pumpkin Oreo Balls shine. With just a handful of ingredients and minimal prep time, you can whip up a crowd-pleasing treat in no time. Plus, they’re endlessly customizable! Want to add a sprinkle of cinnamon or a dash of pumpkin pie spice? Go right ahead!
Not to mention, they’re visually appealing, making them a hit at any gathering. Picture your guests’ faces lighting up when they see these adorable pumpkin-shaped treats adorned with pretzel sticks and green icing leaves. With 24 servings in this recipe, they’re perfect for sharing at potlucks or fall parties.
For more seasonal dessert ideas, check out Taste of Home). Get ready to impress everyone with these fun and festive bites!
Ingredients for Pumpkin Oreo Balls
Essential ingredients for a delicious treat
To whip up these mouthwatering Pumpkin Oreo Balls, you'll need just a few essential ingredients that pack a flavorful punch:
- 36 Oreo cookies: The classic chocolate cookies are a must-have for that signature crunch and rich flavor.
- 8 oz cream cheese (softened): Cream cheese adds a silky texture, making the filling irresistibly creamy and delightful.
- 12 oz orange candy melts: These are perfect for coating your balls in that festive pumpkin color, giving them a fun twist.
These foundational ingredients ensure your Pumpkin Oreo Balls are a hit at any gathering. If you're looking for more inspiration, consider checking out other no-bake recipes at reputable sources like AllRecipes or Taste of Home.
Optional ingredients for customization
Feel free to get creative! Here are some additional ingredients you might consider to customize your Pumpkin Oreo Balls:
- Sprinkles or candy corn: Add festive flair with colorful sprinkles or cute candy corn on top.
- Crushed nuts: For a different texture, try adding chopped pecans or walnuts to the mixture.
- Flavor extracts: A dash of vanilla or pumpkin spice extract can elevate the flavor even more.
These optional adds allow you to make your dessert truly unique, appealing to a wide range of palates. Explore different combinations and see what becomes your favorite!
Preparing Pumpkin Oreo Balls
Making Pumpkin Oreo Balls is a fun and festive way to embrace the flavors of fall. This no-bake dessert is not only delicious but can also serve as a delightful activity for a cozy night in or a gathering with friends. Let’s get into the details!
Prepare the Oreo mixture
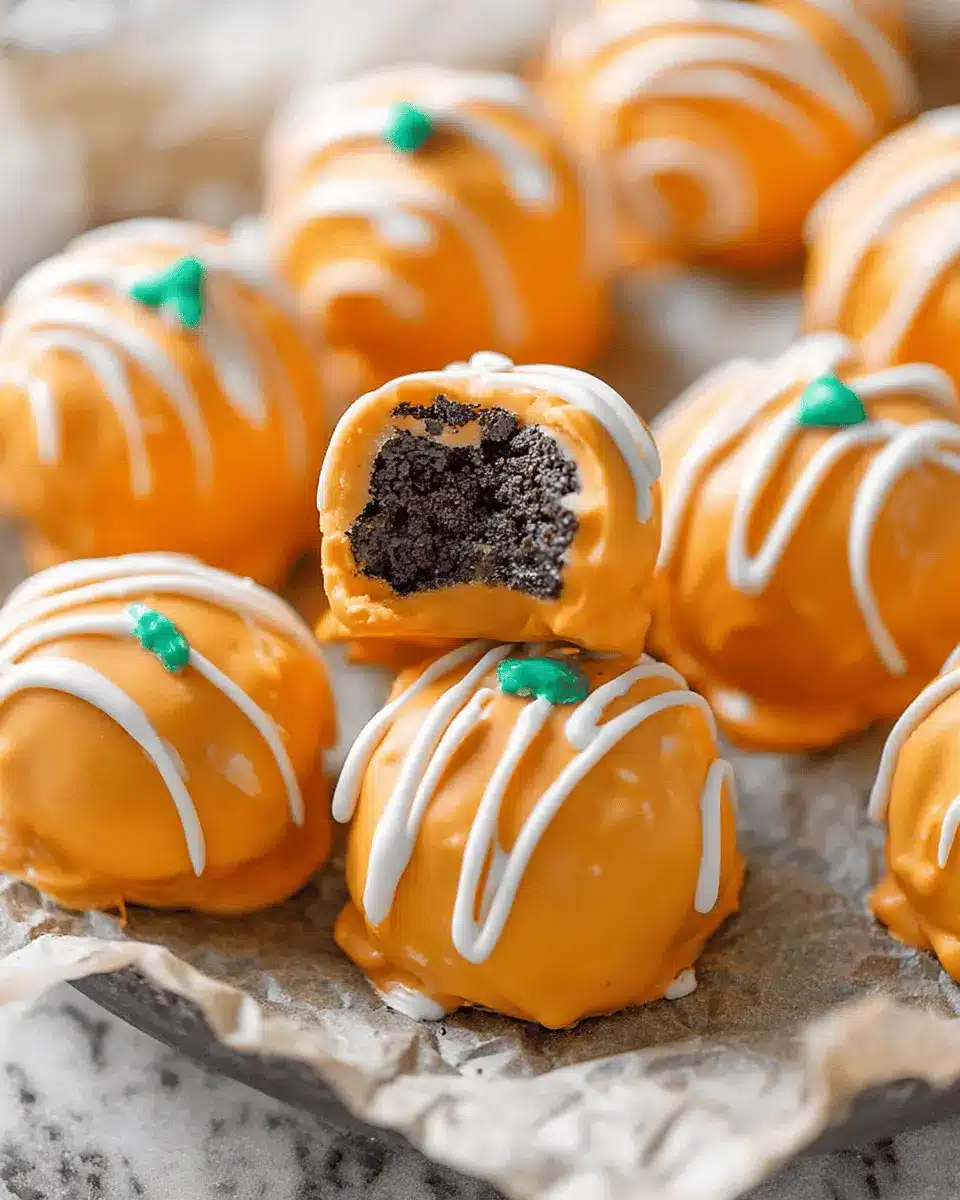
The first step is crucial: you want the perfect combination of cookie and creaminess. Start by taking 36 Oreo cookies and place them in a food processor. Pulse them until they are finely crumbled—think of a sandy texture. This is what gives your Oreo balls their rich chocolate flavor. Once that’s done, add in 8 oz of softened cream cheese. Mix everything together until it forms a thick, cohesive dough. The cream cheese binds the crumbled cookies together, creating a smooth mixture that you’ll love.
Forming the pumpkin balls
Now comes the fun part! Grab a cookie scoop or simply use your hands to take small portions of the Oreo and cream cheese mixture. Form them into 1-inch balls. Place them on a parchment-covered baking sheet, which will make transferring them later much easier. After forming all the balls, pop them into the refrigerator for about 15 minutes. This step helps them firm up, making it easier to dip them later.
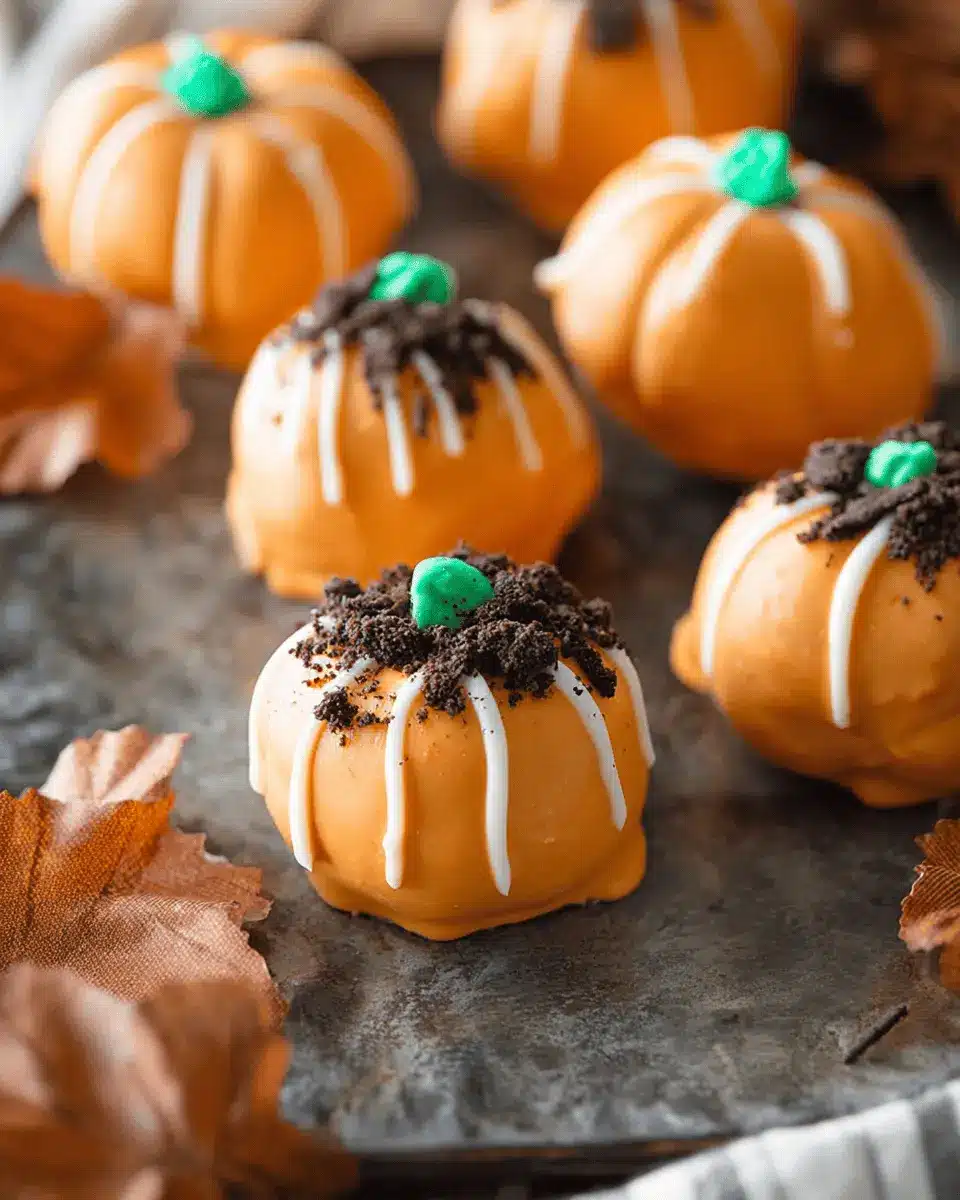
Scoring the pumpkin design
Once your pumpkin balls have chilled, it’s time to give them a pumpkin flair. Using a toothpick, carefully score lines into each ball to mimic the look of a pumpkin. This thoughtful touch makes them look even cuter and festive! After you've scored all your balls, place them back in the refrigerator for another 10 minutes to set the design.
Melting the orange candy melts
While your pumpkin balls chill, it’s time to get the candy melts ready. You’ll need 12 oz of orange candy melts for that perfect pumpkin hue. You can melt these over a double boiler or in the microwave, following the package instructions. If you’re using the microwave, do so in 30-second intervals, stirring in between to ensure even melting. The melted candy should be smooth and free of lumps.
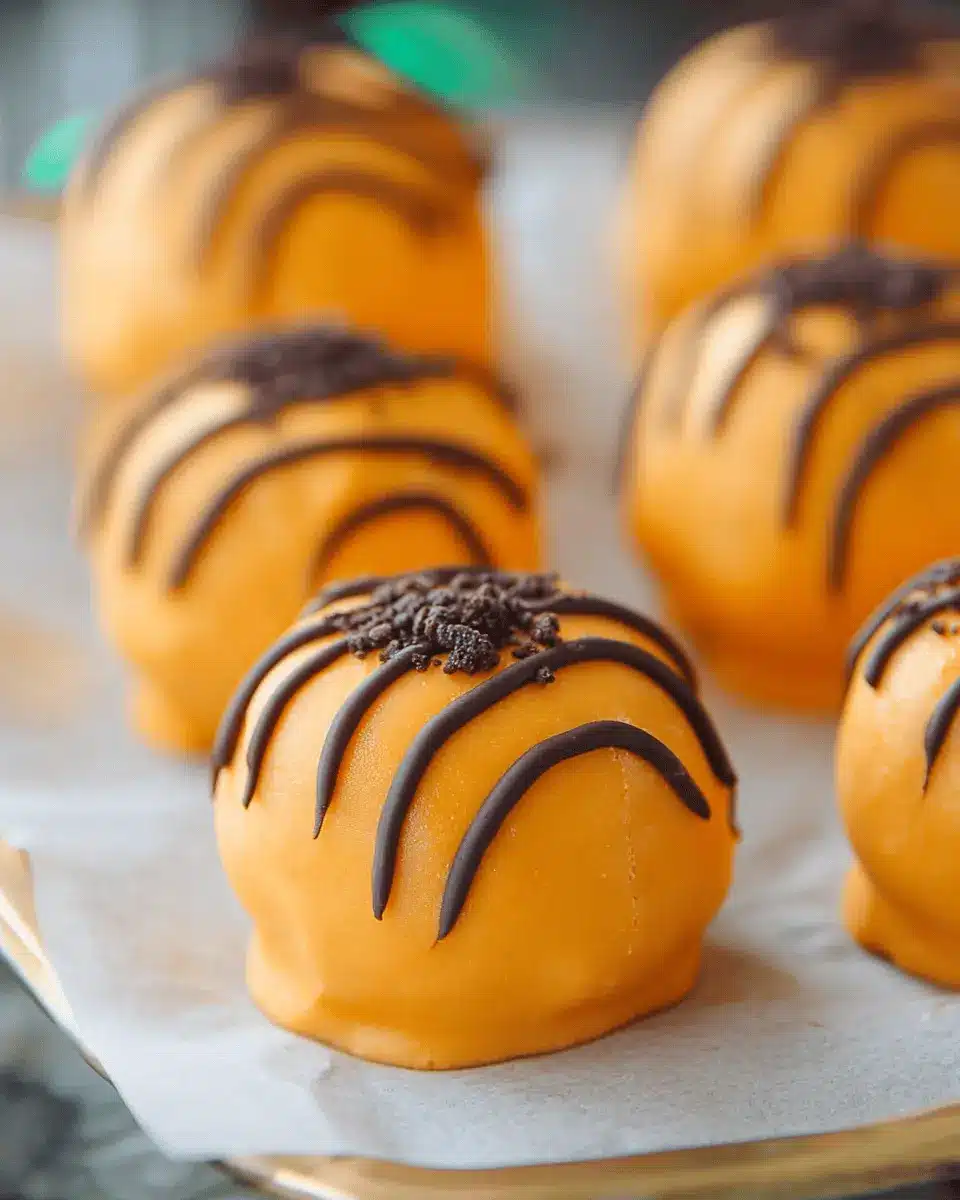
Dipping and decorating the balls
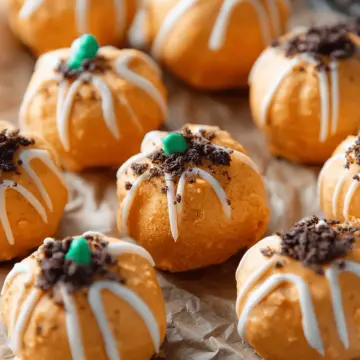
Now we’re at the fun final step! Take each chilled pumpkin ball and dip it into the melted orange chocolate, ensuring it’s fully coated. Allow the excess chocolate to drip off before transferring them back to the lined baking sheet. After dipping, immediately decorate each ball with a small pretzel stick for the pumpkin stem and a bit of green icing for the leaves. This little extra effort elevates the presentation and makes them even more irresistible!
Refrigerate your finished Pumpkin Oreo Balls until you're ready to serve them. These delightful treats are sure to be a hit, perfect for fall gatherings or just as a sweet indulgence on your own! For more fun fall recipes, check out this link for inspiration.
Variations on Pumpkin Oreo Balls
Classic Pumpkin Oreo Balls
The traditional take on Pumpkin Oreo Balls uses the original Oreo cookies, cream cheese, and bright orange candy melts to encapsulate that classic fall flavor. It’s a simple yet delightful treat that never fails to impress during gatherings. And if you want to elevate your presentation, consider adding a thin pretzel stick for a stem—it's an easy way to make your dessert pop! Don't forget to use quality ingredients for the best texture and taste.
Pumpkin Spice Oreo Balls
Feeling adventurous? Try Pumpkin Spice Oreo Balls! Simply swap in pumpkin spice-flavored Oreos for an extra kick of seasonal flavor. The warm notes of cinnamon, nutmeg, and allspice blend beautifully with the creamy filling, making each bite a delightful treat. You could even dust the finished balls with a sprinkle of pumpkin pie spice for an eye-catching finish. For further inspiration, check out ideas from sites like Taste of Home or AllRecipes to mix and match flavors!
Cooking Tips and Notes for Pumpkin Oreo Balls
Tips for Achieving the Best Texture
For the ultimate bite, ensure your cream cheese is adequately softened—this makes mixing with the crushed Oreo cookies smoother. Also, aim for consistency when rolling your balls; uniform shapes help with even coating in the melted chocolate. For a creamier filling, consider adding a touch more cream cheese if the mixture seems too dry.
Common Mistakes to Avoid
One common mistake is skipping the refrigeration steps. Proper chilling allows the Pumpkin Oreo Balls to set and makes them easier to coat in melted chocolate. Additionally, don’t overheat your orange candy melts. If they become too hot, they can seize up, making it tricky to achieve that perfect finish. Keeping these tips in mind will elevate your dessert game! For additional tricks, check out this article on dessert techniques.
Serving suggestions for Pumpkin Oreo Balls
Perfect pairings for your treats
When you whip up a batch of Pumpkin Oreo Balls, the right accompaniments can elevate your dessert experience. Consider serving them alongside a steaming cup of spiced chai or pumpkin spice latte, perfect for cozy gatherings. For a touch of contrast, pair with tart apple slices or a creamy vanilla yogurt dip. These flavors balance the sweetness of the Pumpkin Oreo Balls while adding an exciting twist.
Creative serving ideas
Presentation can make all the difference! Arrange your Pumpkin Oreo Balls on a festive platter, garnished with autumn leaves or mini pumpkins for a seasonal vibe. For a fun twist, skewer them on pretzel sticks to create a playful dessert stick. If you're feeling adventurous, drizzle some melted dark chocolate over the top for an added layer of flavor. Check out more creative serving ideas at Taste of Home or Food Network!
Time details for Pumpkin Oreo Balls
Preparation time
Getting these delightful Pumpkin Oreo Balls ready is a breeze! You’ll only need about 15 minutes for prep. Just gather your ingredients, and let’s get started!
Refrigeration time
After shaping the balls, they need some time in the fridge! Chill them for 25 minutes to ensure they're firm and easy to dip.
Total time
In total, you'll spend around 40 minutes making these delicious treats. It’s a quick and fun recipe that’s perfect for your fall festivities! For more no-bake dessert ideas, check out this article.
Ready to impress your friends with your dessert skills? Let’s dive into the full recipe!
Nutritional Information for Pumpkin Oreo Balls
When you indulge in these delightful Pumpkin Oreo Balls, it's good to know what you're treating yourself to. Each serving (about one ball) contains around 120 calories, making them a sweet but manageable dessert option.
Sugar Content
These creamy bites boast approximately 10 grams of sugar, balanced by the richness of cream cheese and the crunch of Oreos. While they're definitely on the sweeter side, moderation is key!
Protein and Fat Content
Each ball offers about 2 grams of protein and 7 grams of fat, primarily from the cream cheese. The combination creates a satisfyingly rich dessert that keeps you coming back for more. For a lighter twist, you might consider using reduced-fat cream cheese—just a thought!
For those looking for more insights on balancing sweets with healthier choices, check out the USDA Dietary Guidelines for tips on making informed decisions. Remember, it’s about enjoying these treats while keeping your overall diet in check!
FAQs about Pumpkin Oreo Balls
Can I make these ahead of time?
Absolutely! Pumpkin Oreo Balls are perfect for making ahead. You can prepare them a day or two in advance and store them in the fridge. Just make sure to keep them in an airtight container to maintain freshness. When you're ready to serve, take them out and let them sit at room temperature for a few minutes to soften slightly.
How long do Pumpkin Oreo Balls last in the fridge?
When stored properly, your Pumpkin Oreo Balls can last up to one week in the fridge. If you notice a change in texture or odor, it's best to err on the side of caution and toss them. For longer storage, consider freezing them! Just make sure to wrap them well and separate layers with parchment paper.
Can I use a different type of cookie?
Definitely! While Oreos give that classic flavor, feel free to experiment with other types of cookies, such as Gingersnaps or Chocolate Sandwich Cookies. Each option will lend a unique twist to your Pumpkin Oreo Balls while keeping the dessert fun and festive.
For more great pumpkin recipes, check out this pumpkin recipe guide for inspiration!
Conclusion on Pumpkin Oreo Balls
In conclusion, Pumpkin Oreo Balls are a delightful treat that perfectly captures the essence of fall. These easy, no-bake desserts not only taste amazing but also visually impress with their festive appearance. Whether for a party or a cozy night in, you can enjoy making and sharing this irresistible recipe with friends and family. Happy snacking!
Pumpkin Oreo Balls
Equipment
- Food processor
- Double boiler
- parchment paper
Ingredients
- 36 count Oreo cookies
- 8 oz cream cheese softened
- 12 oz orange candy melts
Instructions
- Pulse Oreo cookies in a food processor until finely crumbled.
- Mix in cream cheese until well combined.
- Scoop into 1-inch balls. Refrigerate on a parchment-covered baking sheet for 15 minutes.
- Use a toothpick to score lines into the Oreo balls to resemble pumpkins. Place back into the refrigerator for 10 minutes.
- In the meantime, melt orange candy wafers over a double boiler or in the microwave according to package directions.
- Dip pumpkin oreo balls into melted chocolate, shake off excess, and place back on lined baking sheet. Immediately decorate with a small pretzel stick and leaf icing decoration.
- Refrigerate until ready to serve.
Leave a Reply