
Introduction to Homemade Garlic Butter Rolls
You might think that store-bought rolls are good enough, but once you try homemade garlic butter rolls, you'll quickly realize how much you've been missing. Imagine fluffy, warm rolls straight from your oven, slathered in rich garlic butter, filling your home with an irresistible aroma. These rolls are perfect for family dinners, holiday gatherings, or even a cozy movie night in.
Why Homemade Rolls Are a Game Changer?
Making rolls from scratch allows you to control the ingredients, ensuring freshness and quality. Did you know that the process of kneading dough releases gluten, which gives your rolls that delightful chewiness? Homemade rolls can be customized to your taste. Want to add herbs or cheese? Go for it! Custom versatility ensures you can impress guests or simply enjoy a delicious treat.
Baking with loved ones can also be a bonding experience, adding to the joy of preparing food together. Plus, nothing beats the satisfaction of serving something you've made by hand. And let’s face it: you can never have enough buttery goodness. So if you’re ready to elevate your roll game, grab your apron and let’s get started!
For more about the science of bread-making, check out this article on bread yeast for tips and tricks.
Ingredients for Homemade Garlic Butter Rolls
Essential Ingredients for Fluffy Rolls
To make those irresistibly fluffy homemade garlic butter rolls, you’ll need a few essential components that create that perfect rise and texture. Here’s what you need:
- Warm Water (¼ cup): Essential for activating the yeast—trust me, temperature matters!
- Sugar (2 teaspoons total): This helps the yeast thrive and contributes to browning.
- Active Dry or Instant Yeast (2 ¼ teaspoons): The star player for fluffy rolls.
- Softened Butter (¼ cup): Adds richness to the dough.
- Large Egg (1) and Egg Yolk (1): These enhance the texture and contribute to moisture.
- Warmed Milk (⅓ cup): Keeps the rolls tender.
- All-Purpose Flour (2 ⅓ cups) and Salt (1 teaspoon): The foundational elements of any bread.
Ingredients for the Garlic Butter
Now, let’s talk about the delightful garlic butter that really takes these rolls over the top:
- Softened Butter (6 tablespoons): A generous amount for a luscious coating.
- Garlic Cloves (3, grated): Fresh garlic is key for that robust flavor.
- Dried Parsley or Italian Seasoning (1 teaspoon): A sprinkle of herbs adds that finishing touch.
These simple yet powerful ingredients create a remarkable flavor explosion that’s perfect for any occasion. For more tips, check out helpful resources like Serious Eats. Happy baking!
Step-by-Step Preparation for Homemade Garlic Butter Rolls
Creating homemade garlic butter rolls from scratch is a journey filled with delightful aromas and flavors. With each step, from activating the yeast to baking, you'll be rewarded with fluffy, buttery rolls that will tantalize your taste buds. Let's get started!
Activate the yeast
The first step is to make sure your yeast is lively and ready to work. In a bowl, dissolve 1 teaspoon of sugar into ¼ cup of warm water (ideally between 110°F-115°F). If you don’t have a thermometer handy, just ensure the water feels warm to the touch. Gently stir in 2 ¼ teaspoons of active dry or instant yeast. In a few minutes, you should see bubbles forming—a sure sign that your yeast is activated and primed for the dough.
Cream the butter and sugar
While your yeast is bubbling away, it’s time to cream the butter and sugar. In a stand mixer or large bowl, beat ¼ cup of softened butter with 2 tablespoons of sugar for about one minute until fluffy. Then, add in one large egg and one egg yolk, along with ⅓ cup of warmed milk. Mix for an additional two minutes until everything is well combined and creamy. This step is crucial because it adds richness to your rolls!
Combine wet and dry ingredients
Now, it’s time to bring everything together. Pour your activated yeast mixture into the creamy butter mixture, stirring gently. In a separate bowl, combine 2 ⅓ cups of flour and 1 teaspoon of salt. Gradually add this to the wet mixture while mixing on low speed for about 5-7 minutes until a soft dough forms. If necessary, sprinkle in an extra tablespoon or two of flour until the dough pulls away from the sides of the bowl.
Knead the dough
Transfer the dough to a floured surface and knead it gently for another 2-3 minutes until it’s smooth and elastic. Kneading is a therapeutic part of the process that builds your dough’s strength, ensuring those rolls will rise beautifully.
First rise
Place your kneaded dough in a greased bowl, cover it with a clean kitchen towel, and set it in a warm spot to rise. This step takes about 1-2 hours, or until the dough has doubled in size. For a quicker rise, consider using your oven: preheat it to 200°F, then turn it off and let the dough rise inside.
Shape the rolls
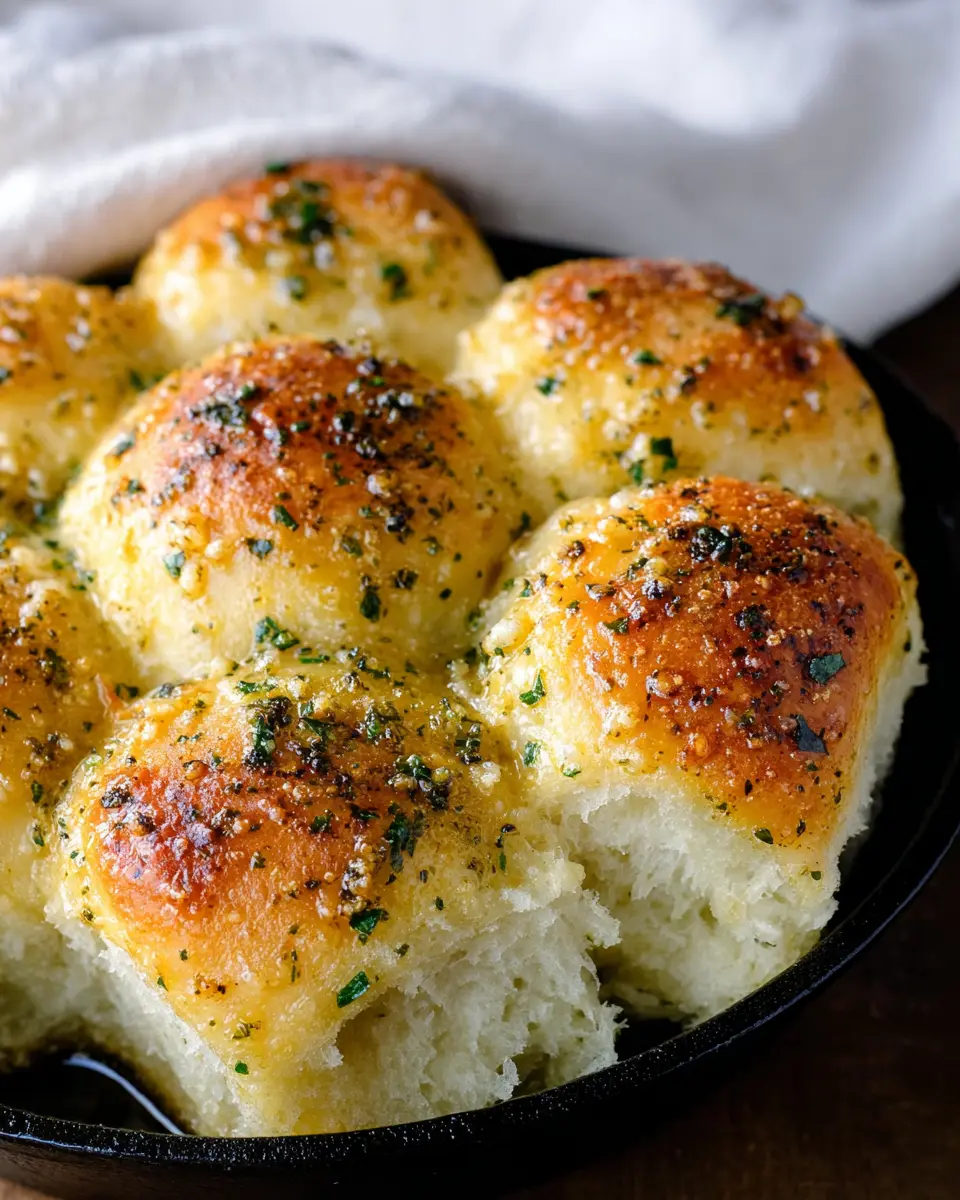
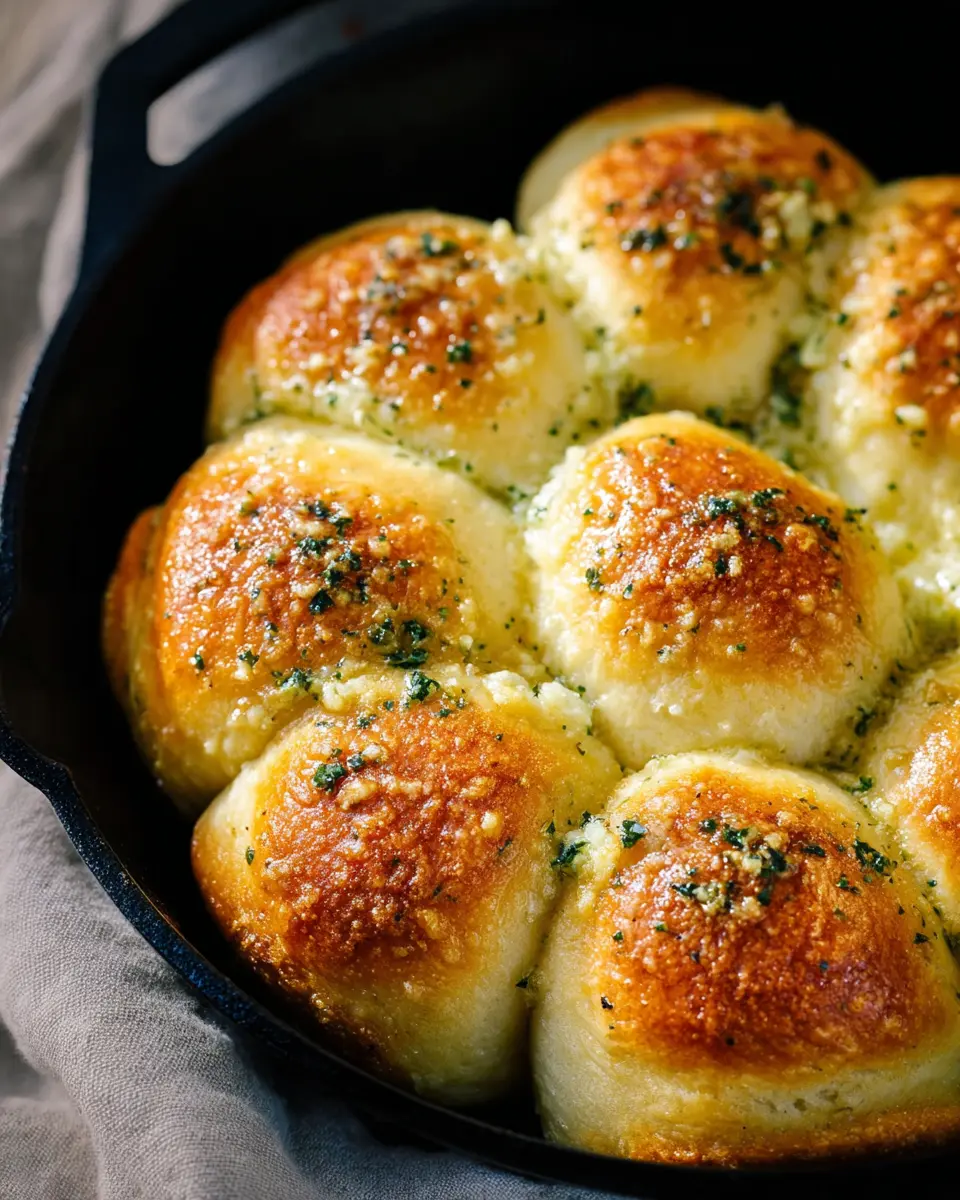
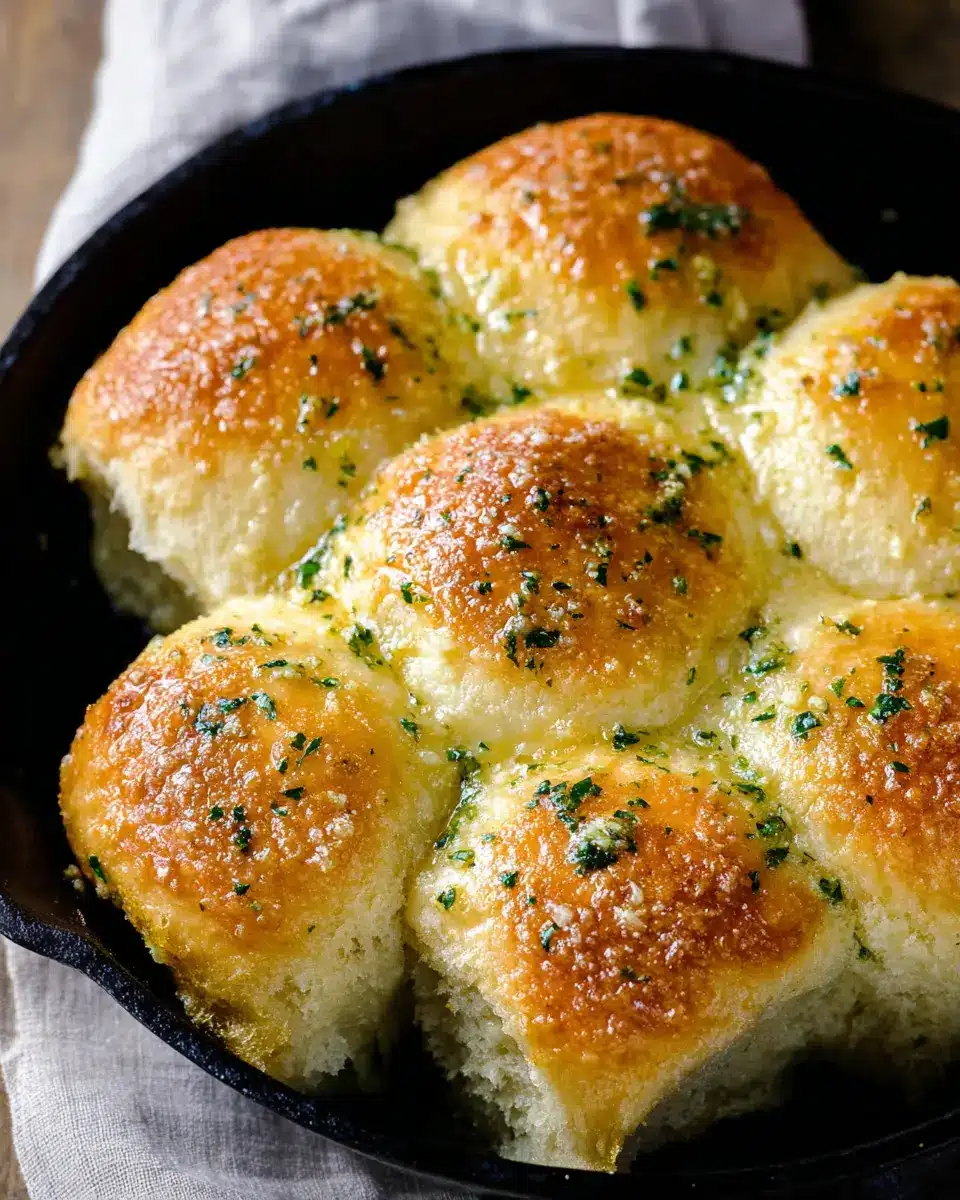
Once the dough has risen, it’s time to shape it into rolls. Divide the dough into 7-9 equal pieces, rolling each one into a ball. Place the balls close together in a greased cast-iron skillet or baking pan, allowing them to touch—this will help them rise up and create those soft, pull-apart rolls we all love.
Add garlic butter and second rise
In a small bowl, mix together 6 tablespoons of softened butter, 3 grated garlic cloves, and 1 teaspoon of dried parsley or Italian seasoning. Spread a quarter of this garlic butter mixture over the shaped rolls. Cover them again and allow them to rise for another hour while you preheat your oven to 350°F.
Bake the rolls
Once they have risen to perfection, it’s time to bake! Pop those rolls into the oven for 14-18 minutes or until they are golden brown. As soon as they’re out of the oven, indulge in more garlic butter application. Brush the remaining garlic butter over the rolls to soak in that flavor. Serve warm and watch your friends and family devour these delicious homemade garlic butter rolls.
Make sure to check out our helpful tips on baking times and baking techniques to ensure your rolls come out perfectly every time! Happy baking!
Variations on Homemade Garlic Butter Rolls
Making homemade garlic butter rolls is a delightful experience. You can easily customize them to suit different tastes and occasions. Here are two variations to consider:
Garlic Herb Rolls
For a fresh twist, enhance your rolls with vibrant herbs. Mix in chopped fresh herbs like rosemary, thyme, or chives into the garlic butter. This not only amplifies the flavor but also adds an appealing aroma that’ll make your kitchen feel like a cozy bistro.
Cheesy Garlic Butter Rolls
If you’re a cheese lover, this variation will make your heart sing. Simply fold in shredded mozzarella or cheddar cheese into the dough before shaping the rolls. The result? Soft, gooey centers that pair perfectly with the garlicky goodness. You can also sprinkle some cheese on top before baking for an extra cheesy crust!
Feel free to explore other flavor combinations as well! For more inspiration, check out The Kitchn’s guide to flavor pairings.
Cooking Tips and Notes for Homemade Garlic Butter Rolls
Ensuring the perfect rise
To achieve a fluffy texture in your homemade garlic butter rolls, it's essential to give your dough the right environment to rise. Warmth is key! Try placing your dough in a lightly warmed oven or a cozy spot in your kitchen. This helps the yeast activate, ensuring a lovely rise. Remember, if your yeast mixture isn’t bubbly after ten minutes, it’s time to start with fresh yeast!
Tips for a golden crust
For a beautiful golden crust, brush the rolls with the remaining garlic butter right before serving. This not only adds flavor but also enhances that perfect, glossy finish. If you prefer, you can also bake the rolls on a preheated baking stone to promote even cooking. Be sure to keep an eye on them—ovens can vary, and a few extra minutes can make all the difference!
For more tips on yeast bread baking, check out King Arthur Baking for expert advice.

Homemade Garlic Butter Rolls
Equipment
- 10 inch cast iron skillet
- non stick skillets
- bosch mixer
- kitchenaid mixer
- measuring cups and spoons
Ingredients
Dough Ingredients
- ¼ cup Warm Water (110-115 degrees)
- 1 teaspoon Sugar
- 2 ¼ teaspoons Yeast (active dry or instant)
- ¼ cup Butter (softened)
- 2 tablespoons Sugar
- 1 large Egg
- 1 large Egg Yolk
- ⅓ cup Milk (preferably warmed)
- 2 ⅓ cups Flour
- 1 teaspoon Salt
Garlic Butter
- 6 tablespoons Butter (softened)
- 3 cloves Garlic (grated)
- 1 teaspoon Dried Parsley or Italian Seasoning
Instructions
Making the Dough
- In a bowl, dissolve 1 teaspoon of sugar into ¼ cup of warm water at 110°F-115°F. Stir in 2 ¼ teaspoons of dry yeast.
- Within several minutes, the yeast will have absorbed enough liquid to activate and start to rise. After ten minutes, the yeast mixture should be bubbling and foamy.
- In a stand mixer or large bowl, cream butter and sugar for 1 minute. Add eggs and milk and mix for 2 more minutes. Add in proofed yeast mixture.
- Pour in flour and salt. Mix for 5-7 minutes. Add 1-3 tablespoons of flour, if needed.
- Cover bowl and set aside to rise in a warm place until double in size, about 1-2 hours.
- Once the dough is doubled, roll into small balls, about 7-9 depending on size preference. Place on greased or buttered baking pan.
- In a small bowl, stir together butter, garlic, and seasonings. Lightly spread ¼ of butter mixture over the rolls.
- Cover and set aside to rise for 1 hour. Preheat oven to 350 degrees. Bake for 14 - 18 minutes or until golden brown.
- Brush rolls with remaining garlic butter. Let the rolls soak up the garlic butter.
- Serve warm or store in an air-tight container.


Leave a Reply